Tune-Up: It's pretty much a Galaxy!
Frequency Expansion:
MAGNUM 257 (New, Amber or Blue)
Open up the radio and look for a small (2*1) circuit board
screwed to the chassis upside down.
On it is 4 "con" positions.
CON 1 is for 10 metre only
CON 2 is for 10 metre and expanded mode that when switched off then on returns
to 10 metre.
CON 3 is for expanded only
CON 4 is for CB band only (26.965 - 27.405)
WITH POWER LEAD DISCONNECTED MOVE JUMPER FRON CON X TO CON X, THEN PRESS RESET
BUTTON FOR 5-10 SECONDS.
TUNE – UP / POWER TWEAKS
#1 ~ Remove bottom cover
#2 ~ Locate RV16. (AM Power)
#3 ~ Adjust RV16 for a carrier of 10 watts on AM mode with the RF Power knob
turned fully clockwise. With the RF Power knob turned fully counter-clockwise,
the AM carrier should be 1 watt.
#4 ~ Locate RV4. (Modulation)
Adjust RV4 for maximum modulation.
#5 ~ Locate RV9. (SSB Power)
Adjust RV9 for maximum forward power in SSB mode.
#6 ~ Locate RV8. (RF Meter)
With RF Output power knob adjusted to show a 5 watt carrier, adjust RV8 just
until the 3rd RF power bar lights up.
Magnum M1
Tune-Up: It's pretty much a Galaxy!
Frequency Expansion:
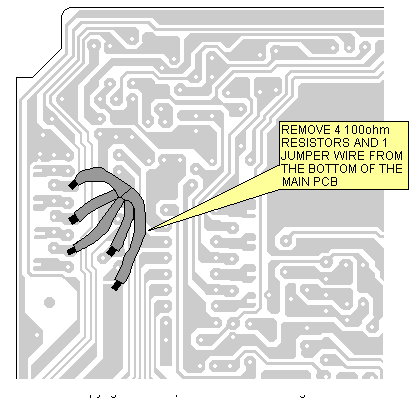
Export Frequency Conversion
|
1.
|
Remove the 4 resistors and jumper wire
from the bottom of the main PCB. The resistors and jumper wire are
inside protective sheathing. |
| 2. | After modification BAND "D" is the regular 40 channel CB band. |
Magnum S3:
Tune-Up:
See Galaxy
Frequency Conversion
Magnum S6:
Tune-Up:
See Galaxy
Frequency Conversion
Magnum S9:
Tune-Up:
See Galaxy
Frequency Conversion
Magnum 3200B
Tune-Up:
AM/FM Power: VR13
ALC: VR12
AMC: VR14
Mod Shunt: TR32
Frequency Conversion:
Magnum Mini Magnum
Mod Limiter: Q10
Frequency Conversion
Magnum MAVERICK A24
Tune-Up:

Frequency Conversion:
Export Frequency Conversion
|
1.
|
Remove the 4
resistors and jumper wire from the bottom of the main PCB. The
resistors and jumper wire are inside protective sheathing. |
| 2. | After modification BAND "D" is the regular 40 channel CB band. |
Echo Modification
|
1.
|
The A24 echo is set for a reverb-type echo ("Big Radio Sound"). If you want to change it to "Turbo" type echo, then slightly increase the value of R-618 on the echo board. Stock, R-618 is a 33K ohm resistor. To experiment with different echo sounds, replace the 33K ohm resistor with a slightly larger values (up to 80K ohm maximum. |
Magnum Millennium 2002
Frequency Mod:
|
FRONT PANEL
CONVERSION
Turn on radio, it will come up on the 10m (28.0-29699) band. Press the FUNC button, then press and hold down for 5 seconds the FREQUENCY SELECTOR SWITCH. The band indicator (A-J) will appear on the screen. To change bands push and release the FREQUENCY SELECTOR SWITCH. Band E is the normal 40 channel CB band. To toggle between frequency and channel display press FUNC, then press and quickly release the CHANNEL SELECTOR SWITCH. When the channel numbers are displayed there will he a number also displayed to the right of the band. This number is the last digit of the frequency display. Every time the radio is turned on it will default to the amateur band. |
Magnum Millennium 2003
Frequency Mod:
|
FRONT PANEL
CONVERSION
Turn on radio, it will come up on the 10m (28.0-29699) band. Press the FUNC button, then press and hold down for 5 seconds the FREQUENCY SELECTOR SWITCH. The band indicator (A-J) will appear on the screen. To change bands push and release the FREQUENCY SELECTOR SWITCH. Band E is the normal 40 channel CB band. To toggle between frequency and channel display press FUNC, then press and quickly release the CHANNEL SELECTOR SWITCH. When the channel numbers are displayed there will he a number also displayed to the right of the band. This number is the last digit of the frequency display. Every time the radio is turned on it will default to the amateur band. |
Magnum Omega Force S45
Frequency Mod:
| . | Make sure Delta Force is turned off and disconnected from power source. |
| 2. | Take off speaker-side cabinet. |
| 3. | Find the CPU Reset Board located near the rear panel of the radio (see diagram below). |
| 4. | On
the CPU Reset Board are 4 jumper positions (CON-1 - CON4). Each jumper position provides a different frequency range and configuration. From the list below, select the desired frequency range and configuration, and move the jumper shunt to the corresponding CON. |
|
CON 1 :
|
10
Meter Only (28.000 - 29.699 MHz) *Default mode *All functions operate normally |
|
CON2 :
|
10
Meter & Expanded Mode *At turn on, the radio defaults to 10 Meter mode. *For Expanded mode, press FUNC and then press CALL for 3 seconds. *To return to 10 Meter mode, repeat above steps. Tor information on Expanded mode operation, see CON3 |
|
CON3 :
|
Expanded Mode Only (25.165 - 29.699 MHz) *In Expanded mode, the frequency range is divided into 10 bands of 40 channels each "Bands are shown on LCD display by letters (A through J) - Band E is regular 40 channel CB. To switch bands, press the CALL button (do not hold down for 3 seconds), *In Expanded mode, either the frequency or channel can be displayed on the LCD. To switch between frequency display and channel display, press the FUNC button and then press the CALL button (do not hold down for 3 seconds). *On the channel display, the small number (0 - 9) to the right of the Band letter is the 1 kHz frequency display. Example: If the frequency is 27.405, then the channel display will indicate 40 E5. "40" being the channel, "E" being the Band, and "5" being the 1 kHz position of 27.405. *In Expanded mode, the RPT and SHIFT functions do not operate |
|
CON4 :
|
40
Channel CB Only (26.965 - 27.405 MHz) *Only operates on the regular 40 CB channels |
|
5.
|
After selecting the desired frequency range and configuration, press the CPU Reset Switch (SW1) for 5 - 10 seconds. |
|
6.
|
Reassemble the radio, turn on and test |